There’s nothing more disappointing than planning an evening in your beautifully lit garden, only for the solar lights to fail.
But don’t worry, knowing how to reset solar lights can fix this quickly.
I’ve tried and tested different methods to help you troubleshoot and fix your solar lights easily.
In this guide, I’ll share the simplest and most effective steps.
We’ll cover everything from making sure your lights are in the best spot, and cleaning the panels, to checking and replacing the batteries.
Key Takeaways
- Resetting your solar lights fixes common issues like charging problems or glitches, ensuring effective illumination.
- Identify when to reset by checking for non-functioning lights, battery issues, sensor problems, or disruptions from power outages.
- Prepare for resetting by wearing safety gear, gathering tools and cleaning supplies, and keeping spare parts ready.
- The resetting process includes ensuring optimal placement, cleaning panels, replacing batteries if needed, and using the on/off switch followed by functionality testing.
- Maintain performance post-reset by regularly cleaning panels, checking batteries, and adjusting placement to maximize sunlight exposure.
Why Is Resetting Your Solar Lights Necessary?
Resetting your solar lights is necessary because it’s a quick fix for annoying issues like charging problems or glitches.
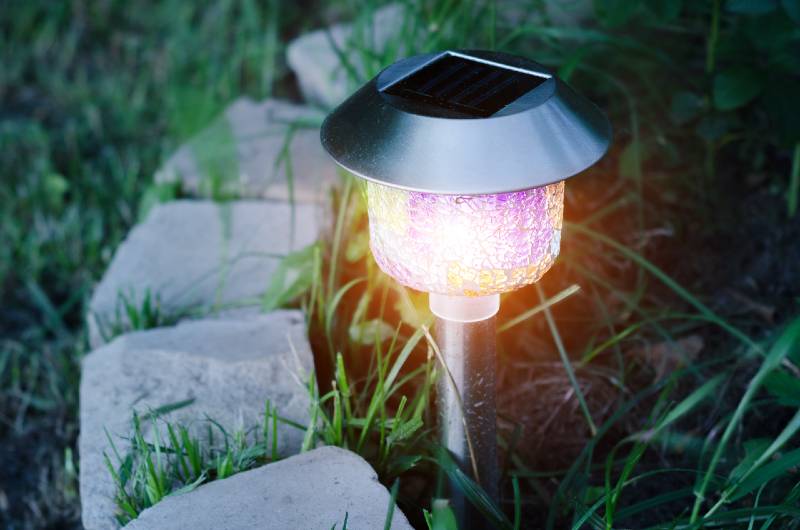
You know, solar lights soak up sunlight all day to shine bright for you at night.
But sometimes, they don’t charge right or just act up.
When you reset them, it’s like hitting the refresh button—it clears out any quirks and gets them back in tip-top shape.
This simple step can keep your lights running smoothly and brighten up your outdoor space just the way you want.
How Do You Identify If Your Solar Lights Need Resetting?
Identifying if your solar lights need resetting can be pretty straightforward if you know the signs to watch for.
Here’s a handy rundown to help you figure out when it might be time to hit the reset button:
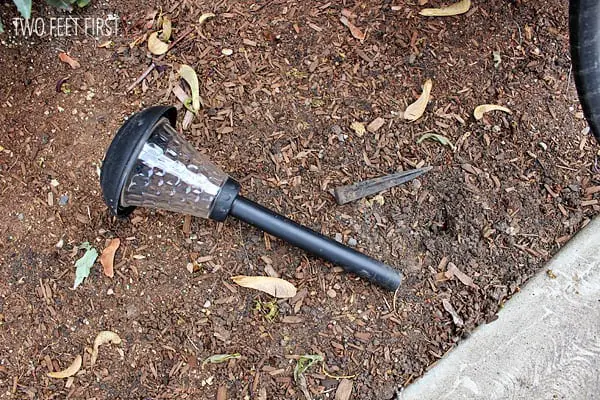
- Lights Aren’t Working: First up, if your solar lights just aren’t lighting up, there could be a blockage. Dirt or debris might be covering the solar panels, preventing them from charging. Cleaning them off is a good first step, but if that doesn’t fix the issue, resetting the lights might be necessary.
- Battery Troubles: Are your lights dying out sooner than they used to? This could be a sign that the batteries aren’t charging properly, maybe due to not getting enough sunlight or because they were installed incorrectly. A reset can help sort out any battery charging issues and get your lights back to their usual selves.
- Sensor Issues: Solar lights know when to turn on based on the light levels—they should glow up as it gets dark and turn off when it gets light. If they start acting up, turning on at the wrong times, or not at all, this suggests a sensor problem. Resetting the lights can recalibrate their sensors and restore normal operation.
- After Power Issues: Lastly, if there’s been a power outage or a significant disruption like a storm, your solar lights might stop functioning as expected. A reset after these events can help re-sync their components and ensure they operate smoothly.
What Should You Prepare Before Resetting Your Solar Lights?
Before you start resetting your solar lights, it’s important to have the right tools and materials ready.
Here’s what you’ll need:
- Safety Comes First: Always remember to wear protective gloves and eyewear before you start. This isn’t just about keeping your hands clean—it’s about keeping them safe from any sharp edges or electrical components.
- Grab a Screwdriver: You’ll likely need a screwdriver to get the cover off your solar lights. Not sure which kind? It’s a good idea to have both Phillips and flathead screwdrivers within reach. They’ll cover most screw types you might encounter.
- Cleaning Supplies: You’ll need a soft cloth or a sponge to clean the solar panels. This is important because dirt or debris can block the sunlight, affecting the charging capability of the lights.
- Keep Spare Parts Ready: Sometimes, you might find out that the batteries or sensors aren’t just acting up—they’re kaput. Having spares on hand means you can swap out the faulty parts during your reset, saving you a second round of work.
How to Reset Solar Lights?
Step 1: Check the Environment and Placement
Before you dive into cleaning or replacing parts, you need to ensure your solar lights are placed in the ideal environment for maximum efficiency.
Here’s a simple breakdown of what to look for:
- Sunlight Exposure: Check if your lights are getting enough sun. They need to bathe in direct sunlight for most of the day to charge up well. So, avoid putting them in shady spots like under thick trees, eaves, or close to buildings that cast long shadows.
- Orientation: Try to point your solar panels south if you’re in the Northern Hemisphere—that’s where they’ll catch the most rays. If they can tilt, adjust them throughout the year to catch the best angle of the sun as it changes with the seasons.
- Avoid Obstructions: Take a quick look around and above your lights now and then. Overgrown plants, new garden decor, or even built-up dirt can block the sun. Keeping them clear of obstructions ensures they won’t miss out on any precious sunlight.
- Surface Reflection: If possible, place your lights near surfaces that could bounce some extra light onto them. Light-colored walls, large stones, or any reflective material can help amp up their sun intake.
Step 2: Clean the Solar Panels
Once you’ve made sure your solar lights are in the best spot to soak up the sun, the next step is to give those solar panels a good clean.
This is important because even a little bit of dirt or debris can block sunlight and reduce how well your lights charge during the day.
Here’s how to do it right:
- Gather Your Cleaning Supplies: You’ll need a soft cloth or a sponge, and some water. If the panels are grimy, a mild soap can help, but usually, water will do the trick.
- Gentle Cleaning: Start by wiping away any loose dust or debris with a dry cloth. Then, dampen your cloth or sponge with water (add a tiny bit of soap if necessary) and gently wipe down the solar panels.
- Rinse If Needed: If you use soap, ensure to lightly rinse the panels with clean water afterward to remove any soapy residue. This is important because soap can leave a film that might block sunlight.
- Dry the Panels: After rinsing, give the panels a final wipe with a dry cloth to remove any water spots. This leaves them clear and ready to charge as efficiently as possible.
- Regular Maintenance: Cleaning your solar panels isn’t just a one-time thing. To keep your lights shining brightly, plan to clean them periodically, especially after storms, in the fall when leaves are falling, or in areas with a lot of bird activity.
Step 3: Inspect and Replace the Batteries if Necessary
Now that your solar lights are positioned just right and the panels are clean, let’s take a moment to check the batteries.
These little powerhouses store all the energy your lights need to keep glowing after dark.
Here’s a straightforward guide to get you through:
- Find the Battery Compartment: You’ll usually find this compartment on the underside of the light or behind a small panel. Grab a screwdriver if you need one to pop it open.
- Give the Batteries a Once-Over: Have a look at the batteries for any signs of wear like corrosion or leakage—common issues as batteries age or face harsh weather. Also, make sure they’re sitting snug in their slots.
- Do a Quick Battery Test: Feeling like your lights aren’t as bright as they used to be? It could be the batteries. If you’ve got a battery tester, see if they still hold a charge. No tester? No problem. If they’re rechargeable and seem weak, try giving them a full recharge. If that doesn’t help, it might be time for new ones.
- Swap Out Old for New: If it turns out those batteries are done for, pop in some new ones that match the specs your light manufacturer recommends. Be careful to line up the + and – correctly—nobody wants the hassle of doing this twice!
- Seal It Up Tight: Once the fresh batteries are in, close up the compartment well. You want to keep moisture and dirt out to avoid any new issues.
- Keep Tabs on Your Batteries: To keep your lights shining bright, plan to check and change the batteries about once a year, or even more often if they get a lot of use.
Step 4: Perform the Actual Reset
So, you’ve made sure your solar lights are perfectly positioned, the panels are sparkling clean, and the batteries are all good—now it’s time to reset them.
It might seem a bit basic, but start by flipping the on/off switch to turn them off.
This simple step is key to making sure the reset works properly.
Give them about 30 seconds to a minute off; this little break lets the internal system fully reset.
After that brief wait, turn the lights back on.
For a lot of solar lights, this is all you need to do to reset them.
But, some lights come with a special reset button.
If yours has one, you’ll want to press and hold this button for a few seconds right after you switch them back on.
Every model’s a bit different, so if you’re not sure what to do, take a quick peek at your user manual for the specifics.
Step 5: Cover the Solar Panel to Test Functionality
Once you’ve reset your solar lights, it’s smart to make sure they’re working right.
A quick and easy test is to trick them into thinking it’s night by covering the solar panels.
Grab a dark cloth or a piece of cardboard and cover the solar panel completely.
You want to block all the light—like it’s the middle of the night.
No peeks of light should get through, because even a sliver might keep them from switching on.
Now, watch what happens.
The lights should pop on, showing that they’re ready to go and everything’s in working order.
If your lights light up, you can now take off the cover and let them get back to their job.
This little test helps confirm that your reset did the trick and that your lights are all set to keep your space bright after dusk.
But if they don’t turn on, there might still be something up.
Maybe it’s the batteries, maybe the solar panel isn’t connecting right, or something internal might need a closer look.
If that’s the case, you might need to do some more troubleshooting or maybe even call in some expert help.
Step 6: Leave Them Off for an Extended Period
If your solar lights still aren’t lighting up the night after you’ve tried covering the panels, it might be time to give them a longer break.
Sometimes, turning them off for a while can do the trick, especially if they’ve only been partially charging up or if recent weather has thrown them off their game.
Here’s what to do: Switch off your solar lights and let them rest for about 24-48 hours.
This break can give their batteries a chance to reset fully, which is helpful if they are the type that suffers from memory effects or if they’ve been overloaded.
While they’re off, it’s a good idea to double-check that their solar panels are still well-placed to catch the sun when you turn them back on.
This way, they’ll get a full charge and hopefully start working better.
After their little vacation, turn the lights back on and see how they do when the sun goes down.
They should light up at dusk and turn off come dawn, just like they’re supposed to.
If everything looks good, then you’ve nailed it!
But if they’re still not up to snuff, there might be a bigger issue at play.
It could be time to think about swapping out some parts, or maybe even getting a pro to take a look.
FAQs
How Do I Reboot My Solar System?
To reboot your solar system, first switch off the DC isolator to disconnect the solar panels and turn off the inverter. After waiting for at least 5 minutes, power the inverter back on, reactivate the DC isolator, and monitor the system’s performance for any issues.
How Do I Get My Solar Lights to Work Again?
To get your solar lights to work again, check that the solar panels are clean, and the batteries are functioning properly, and ensure no obstructions are blocking the sensors or panels.
How to Bring Solar Lights Back to Life?
To bring solar lights back to life, replace old batteries, clean the solar panels thoroughly, and make sure the lights are positioned in full, direct sunlight to maximize their charging capacity.
Conclusion
As promised, we’ve covered everything you need to know about how to reset solar lights.
From making sure they’re in the best spot and cleaning the panels to checking and replacing the batteries, these easy steps will help you fix common problems.
Here’s a pro tip: use a solar light tester to regularly check the voltage of your lights.
This simple tool can help you catch issues early, keeping your garden beautifully lit.
Do you still have questions or need more tips?
Feel free to reach out, and I’ll be happy to help you keep your solar lights shining bright!

Join our solar microdosing newsletter and get bite-sized, easy-to-understand insights into the world of solar energy.
From how solar panels work to building your own DIY solar system, we’ve got you covered.


My solar lamp works opposite time during the day it rurns the light on then at night it does only with sensor, how can i reset it to work properly on time?
Was it like that when you bought it? It appears either the sensor is installed backwards or the light sensor sensitivity is so high. Please, refer to our article on how to fix solar lights and get back to me with any questions you may have.